Process
This is how I create a washboard.

I create a polygonal cuboid and then set 17 subdivisions to it.

Then, I used Edge mode and selected the edges that are inside the cuboid. Then, I beveled these selected edges so they will give me sections to extrude.

I select the faces that I have formed after beveling the edges and extrude them to create the rough part of the washboard.

Then, I selected the edges that were formed by the extruded faces and then beveled them.

I created two new polygonal cubes and then aligned them properly so they would form the header and the panel of the washboard.

Next, I created a new polygonal cuboid and then aligned it together with the stringer, the panel and the glass. This would make the glass look like it is part of the stringer. Next, I duplicated the top stringer and moved it to the bottom to make the bottom stringer.

I then created one more polygon. This polygon would be the left leg of the washboard. I then aligned the left leg to the panel and then duplicated it to create the right leg. I then aligned the right leg to the panel.

I then selected everything except for the glass and then beveled them.
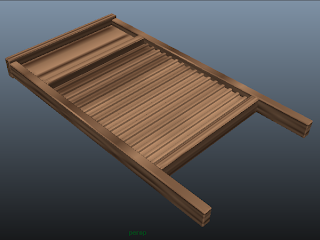
This is the end product of my magnificent washboard:

Techniques
The main technique that I have learnt here is the align tool.
The align tool helps me to make sure that the different parts of the object connect with each other properly. If I had used the move tool instead, it would be less accurate.
Reflection
This exercise was pretty simple.
There was not much custom shapes involved, as the only custom shape was the glass section of the washboard. The rest were just using primitive shapes. As compared to the previous exercises for this week, this exercise does not need a template to outline and there was not much manipulation involved, hence i did this exercise in a jiffy.
Although the align tool was kind of hard to work with, as I had to look at the object at different angles in order to find the correct alignment buttons to press, I managed to get it over and done with. This might be due to the fact that I have not used to align tool enough, therefore I should use it more often.
Overall, I find this exercise satisfactory as the washboard turned out to be quite nice after all!
References
2.6 MM_Washboard Modelling.pdf
No comments:
Post a Comment