Monday, May 23, 2011

Assignment 1: Story, Shape and Design


As the rat was racing halfway, the controls in the rat's car suddenly went haywire. It seems like someone sabotaged the circuits of the rat's car. A evil grin came from the cat as he raced past the rat. The rat thought that all hope had been lost. Suddenly, his friend, the brown mouse, threw him a Street Fighter IV Mad Catz Tournament Edition Arcade Fighting Stick. The brown mouse told the rat to plug the arcade stick into the car. The rat plugged the arcade stick into the car and the car felt as if it came back to life from the dead. Then, the car started playing Street Fighter music and it granted the rat a new ability to shoot Hadoukens at other racers. It also granted him enhanced speed. With that, he raced forward and went on to catch up in the race.

Shape

The Street Fighter IV Mad Catz Tournament Edition Arcade Fighting Stick has a quadrilateral like shape so I shall created a simple quadrilateral to start off to model from. I shall then model the vertices to make the shape more similar to the real model. There are quite a few primitive shapes used. There would be 6 screws made out of spheres on the arcade stick, which i will then create a cylinder to difference into the screws to make the holes of the screws, 8 main buttons (using the method i had used in the previous exercise for my kempton joystick) , 2 core buttons (Start and Select Buttons), 2 utility buttons (Turbo and Playstation buttons), 2 switches by creating a oval + cube hybrid shape for the switch holes and a cylinder for the switches itself, one main joystick made out of a sphere for the head, a cylinder for the stick and a pipe for the ring below the arcade stick. I would also make 4 legs for the bottom of the arcade stick, consisting of one cylinder scaled and then combined with a screw shape. I will also use a quadrilateral for the art plate of the arcade stick.
There would be one main quadrilateral, mainly the base of the polygon.

My toy does not need complex texturing of the object. In this case, I shall just use the blinn texture for the entire object. This is because although my toy is made out of plastic (The main parts), It looks metallic more than opaque and plain.

Design


The back view of the arcade stick.

The front view of the arcade stick.

The side view of the arcade stick.

The top view of the arcade stick.

Wiremesh

Top view

Side view

Front view

Back view

Components of the arcade stick

Wednesday, May 18, 2011

Week 2 Lab 2 - Gear

Process

This is how i create a gear.

I create a pipe with 4 subdivisions for height, 3 subdivisions for caps and 32 subdivisions for axis.

I select the faces that are in the middle of the gear so that they can be extruded to form the teeth of the gear.

I then extrude the faces that i have selected to make the teeth.

Techniques

The main technique taught here was the extrude tool.

The extrude tool helps to pull out a face, affecting the selected face only. If you were to pull it out using the scale or move tool, the neighbor faces would move too.

Reflection

This exercise is extremely easy to do.

I felt that this gave me quite a warm up on what to expect from the extrude tool! If this were the tip of the iceberg, I can't imagine what it would be like if I had to extrude more complicated faces!

Note: I forgot to post this on my blog, so i had to post it now, but it's not in order already. :/

References

gear_01.htm


Research - Common Mistakes

Upon looking at me and my peers' work, I have found several common mistakes.

1) Setting the wrong axis for the Revolve Tool.

This is one of the more common ones. Revolve tool has the option to revolve around the 3 axes. As shown in the blog post of my vase down below, if I revolve my curve around the Z or X axis, it would give me some weird shape or maybe a "black hole of doom", which has been experienced by many of my peers. Whereas If i revolve it around the Y axis, It gives me what I want. I am also not trying to say that all objects must be revolved around the Y axis. It depends on how the person wants to revolve the object.

2) Accidentally selecting another object without knowing it and then differencing.

Sometimes, we get careless and select things that are unnecessary. However, we do not notice them, simply because they're too hard to notice. Whether they are embedded inside another object, or just simply out of sight, they are an irritant. When you accidentally select them and try to difference, It either just wont work, or it differences wrongly, giving the student headache. This problem can be solved by either using layers, or hiding everything that is just unselected.

This is definitely the most common mistake. The same scenario goes to beveling of edges and extruding of faces. If you accidentally select another face or edge and go on to process it, it will turn out to be a monstrosity.

3) Accidentally clicking on the smooth button.

Actually, this problem might just be occurring to me only. I actually do not know the actual shortcut to the smooth tool, but i know i have clicked on it a couple of times. This is my most annoying error, as when i smooth the object, I cannot used the conventional ctrl-z to undo it. I have to go to the history and actually erase the smoothing.

References

The Revolve Tool:

Research - Hypershade

I have searched for a way to colour my models in Maya and this is what I came out with.

To colour an object:

1) Open Hypershade editor which is under Window > Rendering Editors > Hypershade.

2) Create a new texture by double clicking on the texture i want and then giving a name.

3) Select the object that I want to colour, then hold right click on the material that you want to assign the object to, and click "Assign Material To Selection".

Alternatively, one can also right click on the object, scroll down the options to "Assign New Material, Assign Existing Material or Assign Favourite Material. "

I also can select which parts of an object I want to colour by using face mode. I select the faces that I want to be coloured and assign a material to them.

References:

Add Some Colour:

Showcase - Kempston Pro Joystick


Techniques

I have used beveling and polygon modelling extensively in this work.
By beveling, I could create the realistic edges of the joystick and the buttons.

Reflection

For this exercise, I have learnt how to use Hypershade to add colour to my joystick. Although my joystick is not perfect and does not look good at all, I feel that I have learnt more about Maya with this exercise, by doing all the extensive beveling and polygon creating.

References

The website that provided me the tutorial:

Monday, May 16, 2011

Week 4 Lab 1 - 3D Mindset and Learning

Does Multitasking give you a real or false sense of having accomplished something?

That will depend. For me, Multitasking is really not my thing. I tend to overlook many things when I multitask. This is because when I multitask, I tend to be more easily distracted by other things, such as my IM services, social networking sites such as Twitter and Facebook and games. My mind keeps swaying back and forth when I am multitasking and it might sway to the wrong place. Therefore, to me, Multitasking is equivalent to procrastination. When I focus my mindset on one single task, I tend to be at least 3 times more productive than multitasking. Hence, for me, multitasking gives me a false sense of achievement.

However, that is in my opinion only. Some people could really multitask well. By multitasking well, I mean by managing their different tasks properly so that each task would have an equal amount of effort distributed into it. That would give people a real sense of achievement.

Is learning 3D and design different from learning programming, or is all learning the same? Why?

Learning 3D and learning programming are usually not the same. Learning 3D requires the person to learn all about interface, get used to it, and then let their own creative juices flow. 3D also has a visual outlook to learning, where you can see how your object change as you create it and modify it.

Learning programming is different. It requires the user to learn and memorize what each different syntax does and on how to apply those syntax. In programming, everything you do is in text and you would not know whether your output would be nice or not untill you finished everything.

However, both are same in the way that both need precision and practice. Practice leads to precision. If a person does not practice something enough, he will naturally be not good at it. This applies to all of learning. Also, with practice, you will be more precise in your work. Just like for 3D, you need to precise so that models don't overlap each other and in programming, you need to be precise, otherwise your entire program won't work at all.

The article states that "Learning is actually a very complex operation for an individual". Do you agree with this? Do you feel that you approach your learning in the best way - if yes, how, and if no, how can you change your work style?

I have to agree with this statement. When someone learns a new topic, they will have to process the information in their brain and then memorize the information that was taught. By processing, I mean by taking the information, breaking it up into different parts so that the brain can know the full meaning of the information. Also, application of the information learnt is also part of learning. This is usually one of the hardest parts of learning, as there might be infinite ways that the information can be applied, and one must know which correct form of application to use.

My approach to my own learning might be the best way for me. I learn things in my own pace, whenever I feel interested. See, when I am interested, I put in all my attention into the thing that I am interested in and don't like to be disturbed when I am doing it. With my own style of learning, alot of information can be seeped through my mind and I am usually clear headed when learning. However, the only problem with this way is that it is kind of hard to build interest in learning. Usually, interest only builds up within me when I feel like my grades are dropping or when I have last minute work to do. My style of learning would be made better if I can, in my own free time, build up interest in my subjects and deem them as fun.

What are your thoughts about the last paragraph in the extract?

I totally agree with what is being said in the last paragraph. This is because you are doing your work for other people to look at and to use, not for yourself. Therefore, you cannot just do your work using only your own mindset.

You see, communication is necessary to the fact that you are not the only person in this world. A person must take criticism and comments about his/her work in order to improve and to serve the world better. Without criticism, a person would think that his or her work is perfect and market it out, only to find out that nobody likes the work at all. That's why in gaming, there are playtesting stages such as alpha stage, closed beta stage and open beta stage.

Also, A person has got to fit in with his group. Imagine if a person creates part of an extremely nice jigsaw puzzle, whereas a person creates the other half. However, if these two people don't work together and the pieces don't fit, then the jigsaw puzzle is just deemed useless. People are like pieces of a jigsaw puzzle. They have got to fit in with each other to create a powerful force, just like how pieces of a jigsaw puzzle form together to create a picture.

Should your lecturers also focus on your work attitude, or just leave you to sink or swim on your own? Why?

I think that lecturers should focus on our work attitude, to some certain extent. Lecturers are called their namesake for a reason. They are here to lecture us about work, so that knowledge would be transferred to us. However, that is where the lecturers stop their involvement. It is then up to the student to decided how he wants to use the knowledge that is passed on to us. If the student decides not to use the knowledge and play games whole day, then it is not the lecturers fault.

This is unlike high school, where our teachers spoonfeed us with information. We have our own responsibility to learn. Also, I think that by using our own responsibility to learn, we can learn multiple times more than if lecturers were to teach us instead. When we go out to the industry to work, it doesn't mean that we have to stop learning. By then, there are no "Lecturers" to help us in our learning, and that we should do everything ourselves. This is a good time to start from.

However, even though lecturers do not interfere in how we perceive our work, they should be contactable at all times, so that students can contact them and ask for their advice in work.


Sunday, May 15, 2011

Week 3 Lab 2 - Washboard

Process

This is how I create a washboard.

I create a polygonal cuboid and then set 17 subdivisions to it.

Then, I used Edge mode and selected the edges that are inside the cuboid. Then, I beveled these selected edges so they will give me sections to extrude.

I select the faces that I have formed after beveling the edges and extrude them to create the rough part of the washboard.

Then, I selected the edges that were formed by the extruded faces and then beveled them.

I created two new polygonal cubes and then aligned them properly so they would form the header and the panel of the washboard.

Next, I created a new polygonal cuboid and then aligned it together with the stringer, the panel and the glass. This would make the glass look like it is part of the stringer. Next, I duplicated the top stringer and moved it to the bottom to make the bottom stringer.

I then created one more polygon. This polygon would be the left leg of the washboard. I then aligned the left leg to the panel and then duplicated it to create the right leg. I then aligned the right leg to the panel.

I then selected everything except for the glass and then beveled them.

This is the end product of my magnificent washboard:


Techniques

The main technique that I have learnt here is the align tool.

The align tool helps me to make sure that the different parts of the object connect with each other properly. If I had used the move tool instead, it would be less accurate.

Reflection

This exercise was pretty simple.

There was not much custom shapes involved, as the only custom shape was the glass section of the washboard. The rest were just using primitive shapes. As compared to the previous exercises for this week, this exercise does not need a template to outline and there was not much manipulation involved, hence i did this exercise in a jiffy.

Although the align tool was kind of hard to work with, as I had to look at the object at different angles in order to find the correct alignment buttons to press, I managed to get it over and done with. This might be due to the fact that I have not used to align tool enough, therefore I should use it more often.

Overall, I find this exercise satisfactory as the washboard turned out to be quite nice after all!

References

2.6 MM_Washboard Modelling.pdf

Week 3 Lab 2 - Tracks

Process

This is how I create tracks.

I create a polygonal plane in the front panel and then assign a track_outline texture to the plane so that i can be used to outline my track.

Just like in the previous exercise, I normalized the UVs so that the image is positioned properly on the plane.

I used the Create Polygon Tool and outlined the track. Then, I made the the plane that is used for the template of the outlining invisible.

I then used the extrude tool to extrude the polygon that i have created. Now it forms a nice and solid straight track.

I used the edge loop tool to create 2 subsections in the bottom faces. I then scaled them outwards and then used the newly created faces to extrude out a connecting section. Then, I used the newly created face at the end of the track and extruded it outwards to create a connector. I then beveled it to make it look less sharp.

I used the create deformer tool to make a nonlinear bend deformer so that I could bend the object or curve it in any angle i want.

This is the end result of my two tracks:

Note: I managed to hide the deformers so it would not spoil the look of the tracks.

Techniques

The techniques I have learnt here are the create polygon tool and the create deformer tool.

The create polygon tool helped me to outline a picture and then create a polygon using the enclosed space given in the outline. However, unlike the previous exercise, where i used the create curve tool, this tool creates the polygon already and so I can manipulate it as a polygonal plane before extrusion.

The create deformer tool helped me to curve the finished track in different angles.

Reflection

This exercise took me quite fast to finish.

I know why I took so fast to finish. This is because I am pretty familiar with the Maya interface and its tools after using it for awhile. Especially after doing the last exercise, which was the bucket exercise, I can find and locate the correct tools quite efficiently.

Although I took faster to finish this, I realise that I do not have as much satisfaction in finishing this compared to as when I was finishing my bucket. I guess this is because I put in less effort in this compared to the bucket exercise.

Overall, I feel that this is still an important and knowledgeable exercise.

References

2.5 MM_Track Modelling.pdf

Week 3 Lab 1 - Vase

Process

This is how I create a simple vase.

I switched to the front panel. Using the CV Curve tool, I create several curves. This is because I wanted some parts of the vase to be linear and some parts of the vase to be curvy.

Then, I used to revolve tool and experimented with it. First, I set the pivot point of revolution by using the move tool and click on the vertex from which i started with. Then, I wrote down the Translate XYZ values and then input them into the pivot point on the revolve options menu. I tried to revolve the vase around the X axis, but it gave me something like this:

So I undo the revolve tool and instead changed the axis to revolve around to the Y axis. This is what I got for revolving around the Y axis:

Which is exactly what I wanted.

This is the end product of my strange looking, but awesome vase:


Techniques

Much like the previous bucket exercise, I used the revolve tool and create CV Curve tool to make this vase.

Reflection

This exercise is the easiest exercise so far.

This is because I only needed two techniques, the revolve tool and the CV Curve tool.

However, what I have learnt from this exercise is to use my own values and options by experimenting with the revolve options, instead of plainly following the pdf files that are provided to me as a step by step guide.

This exercise has given me more insight about Maya, in the sense that I am more familiar with surfaces related tools now.

I drew an outline of a vase, but it turned out to look like the goblet of fire from the Harry Potter movies. But, hey, vases can be oddly shaped right? :D

Overall, I enjoyed this exercise pretty much as I can get to make my own creation.

References

I did this all on my own.

Week 3 Lab 1 - Bucket

Process

This is how I create a simple bucket.

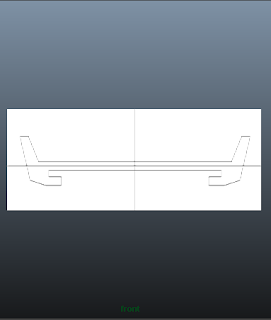
Firstly, I create a polygonal plane and set translate values so that the right side of the plane touches the Y axis and the bottom side of the plane touches the X axis. From there, I assign a bucket_profile texture to it so that i can use this texture to outline the bucket.

However, the image is not centered, so i use normalize UVs to get let the entire picture be the texture of my plane, and not just part of it.

From there, i outlined the bucket using the curve tool and then made the plane, which was the template for outlining transparent so that only the outline is visible.

From there, I used the revolve tool and revolved the entire outline so that it will form a nice bucket-like shape. From there, i selected perspective view to make sure that the bucket looks plausible, like a real bucket.

For the next step, I did this:
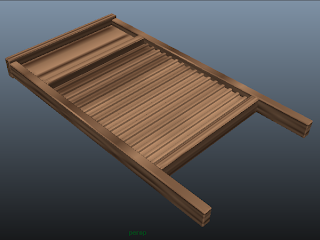
I selected two faces underneath the lip of the bucket. I selected these two faces by adjusting the axes so that when i extrude my bucket later and view the extruded faces in the front panel, I would be able to see both extruded faces. Then, I used the faces on top of it as a guide, as shown in my picture. From there, i continued on to the center of the bucket and thus, I can see which two faces are opposite the two faces i selected. Then, I selected the faces that are in the interior of the bucket and traced to the opposite underside faces. However, this does not mean that they are perfectly opposite of each other. Therefore, i counted the number of faces in the interior of the bucket that are not selected. Since they are split into half, I counted each half and see whether both halves have the same number of faces. After I have confirmed that they are perfectly opposite, i deselect the faces i used for tracing.

I then extrude the faces I have selected and make tabs for the bucket. Then, I beveled the corners of the tabs.

Note: At first, I tried selecting points at random, but then I found out that when i viewed it in the front panel, i would not be able to see both tabs simultaneously on the bucket.

From there, I selected the vertices of the tabs and then scaled them properly so that the tabs look straight proportional to the bucket lips. Then, I create cylinders and then moved them to the center of the tabs. By using booleans - differences, I made holes in the tabs.

Note: I created the cylinders in the side panel. However, when I went to the front panel, I could not locate my cylinder. I switched to the perspective panel and there i found it, in the interior of the bucket.

I switched to the front panel and zoomed in on to one of the tabs. Then, i turned on the grid and created a CV Curve according to the picture shown in the PDF file. I then used the edit point mode and wrote down the XYZ coordinates of the first vertex. From there, I used the revolve tool and then input the values that I have written down to act as the pivot point of the object that I am creating.

I switched to the top panel view and used the CV Circle tool to create the outline of the handle that I will be creating. I created 7 vertexes for the curve and then later moved these vertexes so that the curve will look smoother.

I then switched to side view to draw out the profile that will be used for the handle. I then proceeded to extrude the handle along the curve that I had previously created. Then, I used mirror geometry and fill hole to complete the handle.

I then switched to the perspective panel and proceeded to hide everything except for the handle. From there, I used the soft manipulation tool so as to make sure that only certain parts of the handle are being scaled and not the entire object itself.

As shown in this picture, I have extruded the handle past the connector and then scaled the part of the handle that is supposed to be in the connector so that it will fit into the narrow space of the connector. Also, I have modified the extruded face so that it will look nice with the connector.

I then moved the pivot point of the handle to the center of the connector. This ensures that the handle would rotate by the connector. With that, I give in my finishing touches by rotating the handle to the end that it looks like the handle has been put at a resting position.

This is the end product of my magnificent bucket:


Techniques

The techniques that I have learnt here are the revolve tool and the soft manipulation tool.

The revolve tool helped me make objects that are circular in nature just by using a simple curve or outline as a template.

The soft manipulation tool helped me in making a certain area of an object move or scale. If i used the normal move or scale tool, it would affect the whole object.

Reflection

This was one of the exercise that made me think more deeply about Maya.

I learnt how to import external images as files and use them as a texture for planes to make an outline for objects.

However, during work, there was one point of time where i had no idea where the help line was. I searched Google but the search results were not what i was looking for. Only till my friend told me that the help line was at the bottom left corner of my screen did i know that it was there.

This made me realise that I am still not very familiar with the Graphical User Interface of Maya and that I should practice more often with it.

Also, there was one point where my object did not look like what the object was supposed to be. This made me realise that in modelling, precision is extremely important. If something goes wrong just by a little bit, my whole model would look totally different.

Overall, I enjoyed this exercise as i am quite satisfied with my end product. The road to the product was kind of tedious, however.

References

2.4 MM_Bucket Modelling.pdf
I used Maya Online Help for help about how to use the curve tool properly.
I also searched google on where to find the Help Line, but it didn't work.